前言
开发过程中常见的框架模式有MVC、MVP、MVVM,本篇文章讲解MVVM框架模式的原理及在Android开发中如何实现及使用该框架模式。这里一定要明白MVVM不是某些技术实现而是架构模式或者说是设计思路,我们根据MVVM的设计原理进行架构开发,最终形成的是一系列代码组合而成的MVVM模式的框架,MVVM是Android开发最好的架构选择之一,也是Google官方非常支持和鼓励开发者使用这一架构模式,在这个框架上开发出来的程序稳定性更高,可扩展性更强。
MVVM原理
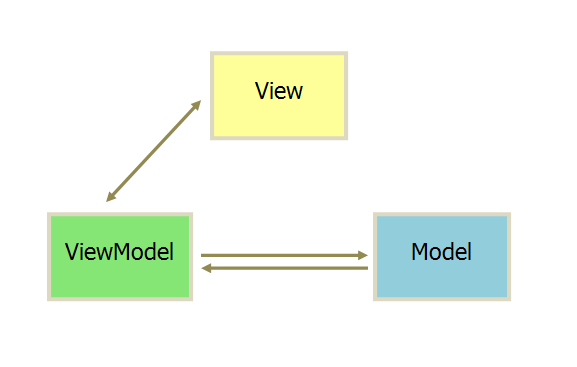
MVVM模式不是四层,任然是3层,是Model-View-ViewModel的简写,VM是ViewModel的缩写,VM可以理解为View的数据模型和Presenter的合体,ViewModel和View之间的交互通过data binding完成。下面我们挨个来来说Model、View、ViewModel。
Model
Model层就是职责数据的存储、读取网络数据、操作数据库数据以及I/O,它就是用来提供数据,不关心数据去做什么。
View
View层做的仅仅和UI相关的工作,在Android中我们只在XML、Activity、Fragment写View层的代码,View层不做和业务相关的事,也就是我们的Activity 不写和业务逻辑相关代码,一般Activity不写更新UI的代码,如果非得要写,那更新的UI必须和业务逻辑和数据是没有关系的,只是单纯UI逻辑来更新UI,比如:滑动时头部颜色渐变、editttext根据输入内容显示隐藏等,简单的说:View层不做任何业务逻辑、不涉及操作数据、不处理数据、UI和数据严格的分开。
ViewModel
ViewModel 只做和业务逻辑和业务数据相关的事,不做任何和UI、控件相关的事,ViewModel 层不会持有任何控件的引用,更不会在ViewModel中通过UI控件的引用去做更新UI的事情。ViewModel就是专注于业务的逻辑处理,操作的也都是对数据进行操作,这些个数据源绑定在相应的控件上会自动去更改UI,开发者不需要关心更新UI的事情。
此处贴出MVVM的模型图
ViewModel是如何让View和Model实现数据绑定,达到自动更新以及数据更新双向的绑定关系呢?
Google在2018年推出了Android Jetpack组件,Jetpack是一个Android软件组件的集合,其中AAC(Android Architecture Components)框架是android官方提供的一系列组件,用来非常方便的实现MVVM架构。
本文主要讲解AAC中Lifecycle、LiveData、ViewModel以及DataBinding的结合使用搭建能够基础开发的MVVM架构项目。
添加依赖
1
2
|
implementation 'android.arch.lifecycle:extensions:1.1.1'
|
MVVM使用
DataBinding
Data Binding(数据绑定)发布于2015年的Google I/O大会,旨在减少Android开发中的大量模板代码(比如findViewById()),增加代码及逻辑清晰度,提高开发效率和维护效率。
什么是Data Binding?
Data Binding,即数据绑定,是Android团队实现MVVM架构的一种方法,使得数据(对象)可以直接绑定到布局的xml中,数据的变化直接反映到View上。
同时,Data Binding也支持双向绑定。
有什么好处?
省去大量模板代码,比如findViewById(),setOnClickListener(), setText(),等等。
使得View与逻辑彻底解耦(MVVM)成为可能,不像MVC那样逻辑与View操作混在一起难以维护,也不像MVP那样定义大量接口,费时费力。
由于数据(对象)与View进行双向绑定,所以开发时只需要关注数据(对象)即可,无需关心View的各种繁杂操作(如setVisibility(),setText()等)
功能强大,xml中即可完成简单的逻辑(xml中支持表达式语言,逻辑/数学运算等)
如何使用?
1.在模块build.gradle中配置如下配置:
1
2
3
4
5
6
7
8
9
10
11
12
13
14
| android {
…
dataBinding {
enabled = true
}
}
Gradle 插件 4.0.0及以上:
android {
buildFeatures{
dataBinding = true
}
}
|
2.修改页面布局结构
1
2
3
4
5
6
7
8
9
10
11
12
13
14
15
16
17
18
19
20
21
22
23
24
25
26
27
28
29
30
31
32
33
34
35
36
37
| 正常页面布局:
<?xml version="1.0" encoding="utf-8"?>
<androidx.constraintlayout.widget.ConstraintLayout xmlns:android="http://schemas.android.com/apk/res/android"
xmlns:app="http://schemas.android.com/apk/res-auto"
xmlns:tools="http://schemas.android.com/tools"
android:layout_width="match_parent"
android:layout_height="match_parent">
<TextView
android:id="@+id/userName"
app:layout_constraintTop_toBottomOf="parent"
app:layout_constraintLeft_toLeftOf="parent"
app:layout_constraintRight_toRightOf="parent"
android:layout_width="wrap_content"
android:layout_height="wrap_content"/>
</androidx.constraintlayout.widget.ConstraintLayout>
支持DataBinding页面布局:
<?xml version="1.0" encoding="utf-8"?>
<layout xmlns:android="http://schemas.android.com/apk/res/android"
xmlns:binding="http://schemas.android.com/apk/res-auto"
xmlns:app="http://schemas.android.com/apk/res-auto">
<data>
</data>
<androidx.constraintlayout.widget.ConstraintLayout
xmlns:tools="http://schemas.android.com/tools"
android:layout_width="match_parent"
android:layout_height="match_parent">
<TextView
android:id="@+id/userName"
app:layout_constraintTop_toBottomOf="parent"
app:layout_constraintLeft_toLeftOf="parent"
app:layout_constraintRight_toRightOf="parent"
android:layout_width="wrap_content"
android:layout_height="wrap_content"/>
</androidx.constraintlayout.widget.ConstraintLayout>
</layout>
|
3.使用DataBinding绑定页面及数据
每个数据绑定布局文件都会生成一个绑定类ViewDataBinding的实例名是根据布局文件名来生成,将之改为首字母大写的驼峰命名法来命名,并省略布局文件名包含的下划线。控件的获取方式类似,但首字母小写
也可以通过如下方式自定义ViewDataBinding的实例名
1
2
3
| <data class="CustomBinding">
</data>
|
绑定页面方式:
1
2
3
4
5
6
7
8
9
10
11
12
13
14
15
| 在Activity中使用
@Override
protected void onCreate(@Nullable Bundle savedInstanceState) {
super.onCreate(savedInstanceState);
ActivityMainBinding mBinding = DataBindingUtil.setContentView(this, R.layout.activity_main);
mBinding.userName.setText("懂了不");
}
在Fragment中使用
@Nullable
@Override
public View onCreateView(LayoutInflater inflater, @Nullable ViewGroup container, @Nullable Bundle savedInstanceState) {
FragmentMainBinding binding = DataBindingUtil.inflate(inflater, R.layout.fragment_main, container, false);
mBinding.userName.setText("懂了不");
return binding.getRoot();
}
|
绑定数据方式:
在这个标签中,我们通常用来做下面的事情:
定义所绑定的数据的名称(变量名)及对应类型
引入页面所需的类
示例如下:
其中””标签表示引入一个类,比如下方例中引入了User类,当然也可以引入其它类,比如常量类或者工具类。
下面””标签定义了本页面所需要的各种数据名称或类型,其类型可以是java中的基础类型,或者自定义的类。
1
2
3
4
5
6
7
8
9
10
11
12
13
14
15
16
17
18
19
20
21
22
23
24
25
26
27
28
29
30
31
32
33
34
35
36
37
38
39
| public class User {
private String userName;
public String getUserName() {
return userName;
}
public void setUserName(String userName) {
this.userName = userName;
}
}
<?xml version="1.0" encoding="utf-8"?>
<layout xmlns:android="http://schemas.android.com/apk/res/android"
xmlns:binding="http://schemas.android.com/apk/res-auto"
xmlns:app="http://schemas.android.com/apk/res-auto">
<data>
<import type="com.mi.qing.common.net.mvvm.User"/>
<!--非import方式使用-->
<!-- <variable-->
<!-- name="user"-->
<!-- type="com.mi.qing.common.net.mvvm.User" />-->
<!--import方式使用-->
<variable
name="user"
type="User" />
</data>
<androidx.constraintlayout.widget.ConstraintLayout
xmlns:tools="http://schemas.android.com/tools"
android:layout_width="match_parent"
android:layout_height="match_parent">
<TextView
android:id="@+id/userName"
app:layout_constraintTop_toBottomOf="parent"
app:layout_constraintLeft_toLeftOf="parent"
app:layout_constraintRight_toRightOf="parent"
android:layout_width="wrap_content"
android:layout_height="wrap_content"/>
</androidx.constraintlayout.widget.ConstraintLayout>
</layout>
|
绑定User数据到布局页面中,并且在TextView中显示使用,@{}格式绑定数据
1
2
3
4
5
6
7
8
9
10
11
12
13
14
15
16
17
18
19
20
| @Override
protected void onCreate(@Nullable Bundle savedInstanceState) {
super.onCreate(savedInstanceState);
ActivityMainBinding mBinding = DataBindingUtil.setContentView(this, R.layout.activity_main);
mBinding.userName.setText("懂了不");
User user = new User();
user.setUserName("明白了不");
mBinding.setUser(user);
}
页面布局TextView中使用User中的userName数据
<TextView
android:id="@+id/userName"
app:layout_constraintTop_toBottomOf="parent"
app:layout_constraintLeft_toLeftOf="parent"
app:layout_constraintRight_toRightOf="parent"
android:text="@{user.userName}"
android:layout_width="wrap_content"
android:layout_height="wrap_content"/>
|
Data Binding 还支持以下操作符:
- 运算符 + - / * %
- 字符串连接 +
- 逻辑与或 && ||
- 二进制 & | ^
- 一元 + - ! ~
- 移位 >> >>> <<
- 比较 == > < >= <= (Note that < needs to be escaped as <)
- instanceof
- Grouping ()
- Literals - character, String, numeric, null
- Cast
- 方法调用
- 域访问
- 数组访问
- 三元操作符
4.使用ObservableField刷新UI
?它其实是一个可观察的
域,通过泛型来使用,可以使用的方法也就三个:
| 方法 |
作用 |
| ObservableField(T value) |
构造函数,设置可观察的域 |
| T get() |
获取可观察的域的内容,可以使用UI控件监测它的值 |
| set(T value) |
设置可观察的域,设置成功之后,会通知UI控件进行更新 |
不过,除了使用ObservableField 之外, Data Binding 为我们提供了基本类型的ObservableXXX (如
ObservableInt )和存放容器的ObservableXXX (如ObservableList )等,同样,如果你想让你自定义的类变成
可观察状态,需要实现Observable 接口。
1
2
3
4
5
6
7
8
9
10
11
12
13
14
15
16
17
18
19
20
21
22
23
24
25
26
27
28
29
30
31
32
33
34
| public class UserModel {
public ObservableField<User> userObservableField = new ObservableField<>();
}
@Override
protected void onCreate(@Nullable Bundle savedInstanceState) {
super.onCreate(savedInstanceState);
ActivityMainBinding mBinding = DataBindingUtil.setContentView(this, R.layout.activity_main);
mBinding.userName.setText("懂了不");
UserModel userModel = new UserModel();
mBinding.setUserModel(userModel);
User user = new User();
user.setUserName("明白了不");
userModel.userObservableField.setUser(user);
}
页面布局data标签中绑定数据
<data>
<variable
name="userModel"
type="包名.UserModel" />
</data>
页面布局TextView中使用User中的userName数据
<TextView
android:id="@+id/userName"
app:layout_constraintTop_toBottomOf="parent"
app:layout_constraintLeft_toLeftOf="parent"
app:layout_constraintRight_toRightOf="parent"
android:text="@{userModel.userObservableField.userName}"
android:layout_width="wrap_content"
android:layout_height="wrap_content"/>
|
5.双向数据绑定
双向绑定的意思即为当数据改变时同时使视图刷新,而视图改变时也可以同时改变数据,比如当EditText输入的内容在TextView上实时显示,同时TextView绑定的数据也会更新
仅仅在将@{userModel.userObservableField.userName} 替换为@={userModel.userObservableField.userName} ,多了一个= 号而已,需要注意的是,属性必须是可观察
的,可以使用上面提到的ObservableField ,也可以自定义实现BaseObservable 接口,双向绑定的时候需要注意
无限循环,更多关于双向绑定还请查看官方文档。
1
2
3
4
5
6
7
8
9
10
11
12
13
14
15
16
17
18
| 页面布局TextView中使用User中的userName数据
<TextView
android:id="@+id/userName"
app:layout_constraintBottom_toBottomOf="parent"
app:layout_constraintLeft_toLeftOf="parent"
app:layout_constraintRight_toLeftOf="@id/userName_edit"
android:text="@{userModel.userObservableField.userName}"
android:layout_width="wrap_content"
android:layout_height="wrap_content"/>
<EditText
android:id="@+id/userName_edit"
app:layout_constraintLeft_toRightOf="@id/userName"
app:layout_constraintBottom_toBottomOf="parent"
app:layout_constraintRight_toRightOf="parent"
android:text="@={userModel.userObservableField.userName}"
android:layout_width="wrap_content"
android:layout_height="wrap_content"/>
|
6.自定义属性BindingAdapter
dataBinding 提供了 BindingAdapter 这个注解用于支持自定义属性,或者是修改原有属性。注解值可以是已有的 xml 属性,例如 android:src、android:text等,也可以自定义属性然后在 xml 中使用
例如,对于一个 ImageView ,我们希望在某个变量值发生变化时,可以动态改变显示的图片,此时就可以通过 BindingAdapter 来实现
需要先定义一个静态方法,为之添加 BindingAdapter 注解,注解值是为 ImageView 控件自定义的属性名,而该静态方法的两个参数可以这样来理解:
当 ImageView 控件的 url 属性值发生变化时,dataBinding 就会将 ImageView 实例以及新的 url 值传递给 loadImage() 方法,从而可以在此动态改变 ImageView 的相关属性
1
2
3
4
5
6
| public class ImageUtils {
@BindingAdapter({"url"})
public static void loadImage(ImageView view, String url) {
Log.e(TAG, "loadImage url : " + url);
}
}
|
在 xml 文件中关联变量值,当中,bind 这个名称可以自定义
1
2
3
4
5
6
7
8
9
10
11
12
13
14
15
16
17
18
19
20
21
22
23
24
| <?xml version="1.0" encoding="utf-8"?>
<layout xmlns:android="http://schemas.android.com/apk/res/android"
xmlns:bind="http://schemas.android.com/apk/res-auto"
xmlns:tools="http://schemas.android.com/tools">
<data>
<variable
name="imageUtils"
type="包名.ImageUtils" />
</data>
<android.support.constraint.ConstraintLayout
android:layout_width="match_parent"
android:layout_height="match_parent"
>
<ImageView
android:id="@+id/image"
android:layout_width="wrap_content"
android:layout_height="wrap_content"
bind:url="@{imageUtils.url}" />
</android.support.constraint.ConstraintLayout>
</layout>
|
DataBinding的其它使用方式参考 文章地址
ViewModel & LiveData
1.LiveData
LiveData 作用跟RxJava类似,是观察数据的类,相比RxJava,它能够在Activity、Fragment和Service之中正确的处理生命周期。这意味着它尊重其他应用程序组件的生命周期,这种感知确保LiveData只更新处于生命周期状态内的应用程序组件。
LiveData是由observer类表示的观察者视为处于活动状态,如果其生命周期处于START或RESUMED状态。LiveData会将观察者视为活动状态,并通知其数据的变化。LiveData未注册的观察对象以及非活动观察者是不会收到有关更新的通知。
那么LiveData 有什么优点呢?
- 数据变更的时候更新UI
- 没有内存泄漏
- 不会因为停止Activity崩溃
- 无需手动处理生命周期
- 共享资源
使用方式:
| 方法名 |
作用 |
| observe(@NonNull LifecycleOwner owner, @NonNull Observer<? super T> observer) |
最常用的方法,需要提供Observer 处理数据变更后的处理。LifecycleOwner 则是我们能够正确处理声明周期的关键! |
| getValue():T |
获取数据 |
| postValue(T value) |
在主线程中更新数据 |
2.ViewModel
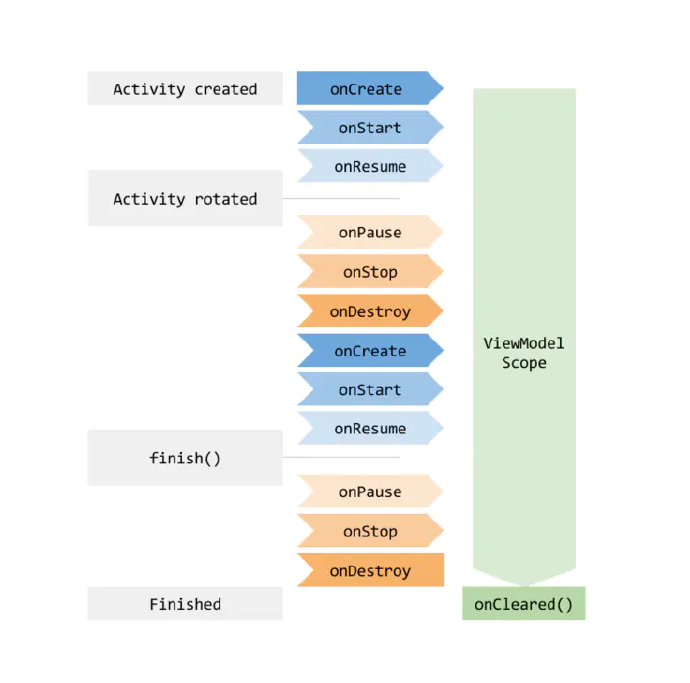
ViewModel 具有生命周期意识的处理跟UI相关的数据,并且,当设备的一些配置信息改变(例如屏幕旋转)它的数据不会消失。
通常情况下,如果我们不做特殊处理,当屏幕旋转的时候,数据会消失,那ViewModel 管理的数据为什么不会消失呢,是因为ViewModel 的生命周期:
ViewModel 的另一个特点就是同一个Activity 的Fragment 之间可以使用ViewModel实现共享数据。
3.定义ViewModel和创建LiveData
1
2
3
4
5
6
7
8
9
10
11
12
13
14
15
16
17
18
19
20
21
22
23
24
25
26
27
28
29
30
31
32
33
34
35
36
37
38
39
40
41
42
43
44
45
46
47
48
49
50
51
52
53
54
55
56
57
58
59
| public class UserModel extends AndroidViewModel{
public MutableLiveData<User> mUser = new MutableLiveData<>();
public AccountModel(@NonNull Application application) {
super(application);
}
public void getUser(){
User user = new User();
user.setUserName("明白了不");
mUser.postValue(user);
}
@Override
protected void onCleared() {
Log.e("AccountModel", "==========onCleared()==========");
super.onCleared();
}
}
@Override
protected void onCreate(@Nullable Bundle savedInstanceState) {
super.onCreate(savedInstanceState);
ActivityMainBinding mBinding = DataBindingUtil.setContentView(this, R.layout.activity_main);
UserModel userModel = ViewModelProviders.of(this).get(UserModel.class);
mBinding.setUserModel(userModel);
userModel.getUser();
}
<?xml version="1.0" encoding="utf-8"?>
<layout xmlns:android="http://schemas.android.com/apk/res/android"
xmlns:bind="http://schemas.android.com/apk/res-auto"
xmlns:tools="http://schemas.android.com/tools">
<data>
<variable
name="userModel"
type="包名.UserModel" />
</data>
<android.support.constraint.ConstraintLayout
android:layout_width="match_parent"
android:layout_height="match_parent"
>
<TextView
android:id="@+id/userName"
app:layout_constraintBottom_toBottomOf="parent"
app:layout_constraintLeft_toLeftOf="parent"
app:layout_constraintRight_toLeftOf="@id/userName_edit"
android:text="@{userModel.mUser.userName}"
android:layout_width="wrap_content"
android:layout_height="wrap_content"/>
</android.support.constraint.ConstraintLayout>
</layout>
|
LiveData的其它使用方式参考 文章地址
ViewModel的其它使用方式参考 文章地址
总结
此处只是简单介绍Android原生支持的MVVM架构模式的组件结合方式,目前github还有比较成熟的框架可以去借鉴一下。
MVVMHabit GITHUB传送门
此处再贴出作者参考搭建的MVVM框架源码
源码地址 MiQingWang/CommonNetFrame